- The CIS compliance checking script is not impacted. Users should continue using it to determine tenancy compliance with the CIS OCI Foundations Benchmark.
- Users looking for a deployment experience similar to CIS Landing Zone should now use OCI Core Landing Zone, where this specific feature is not available. OCI Core Landing Zone evolves CIS Landing Zone and complies with CIS OCI Foundations Benchmark.
- Users looking for a deployment experience based on fully declarable and customizable templates should use the Operating Entities Landing Zone or the OCI Landing Zones Modules in the OCI Landing Zones GitHub organization.
Introduction
CIS OCI Landing Zone V1 requires a user with broad permissions at the tenancy level (typically a member of the Administrators groups) to be provisioned. These tenancy level permissions include the ability to manage IAM resources at the Root compartment level, like managing compartments, policies and groups. In some scenarios these permissions cannot be given to ordinary users, as it can give them a type of power they must not have. But it turns out that some ordinary user may need to provision the Landing Zone, which is especially prevalent in proof of concepts type of scenarios.
Released on July/2021, CIS OCI Landing Zone V2 adds the ability for a user without those broad permissions to also provision the Landing Zone.
This post goes through the available options for provisioning the Landing Zone in either way.
Throughout this post, we use the terms “admin” to refer to a user with the required IAM permissions at the tenancy level and “non-admin” to refer to a user without those IAM permissions.
V2 introduces options for deploying as a non-admin in such a way that V1’s provisioning experience is completely preserved when deploying as an admin.
These options are:
- use_enclosing_compartment: Whether the Landing Zone compartments are created within an enclosing compartment. If false, the Landing Zone compartments are created under the Root compartment.
- existing_enclosing_compartment_ocid: The enclosing compartment OCID where Landing Zone compartments should be created. If not provided and use_enclosing_compartment is true, an enclosing compartment is created in the Root compartment.
- policies_in_root_compartment: Whether required policies at the Root compartment should be created or simply used. Valid values are “USE” and “CREATE”. For using “CREATE”, make sure the user executing the stack has permissions to create policies in the Root compartment. If using “USE”, policies must have been created previously.
- use_existing_groups: Whether existing groups should be reused for this Landing Zone. If false, one set of groups is created. If true, existing group names must be provided and this set will be able to manage resources in this Landing Zone.
- existing_*_group_name: The names of the various existing groups that permissions are granted to. (* representing the various Landing Zone groups).
Deploying as an admin
This is the default use case in V2.
Deploying the Landing Zone with the module’s default variables creates the following:
- Four compartments in the Root compartment.
- Management policies in the Root compartment.
- Management groups in the Root compartment.
- A few non-IAM resources in the Root compartment, including Cloud Guard, events rules for IAM and tag defaults.
- Various resources within each one of the four compartments.
V2 adds options to change this behavior, by allowing admins to:
- Provision those four compartments within an enclosing compartment.
- Reuse existing management policies.
- Reuse existing management groups.
The variables settings for implementing this behavior are:
- use_enclosing_compartment: set this to true.
- existing_enclosing_compartment_ocid: the compartment OCID where you want those four compartments to be created. If not provided, an enclosing compartment is created in the Root compartment.
- policies_in_root_compartment: set this to “USE”.
- use_existing_groups: set this to true.
- existing_*_group_name: MUST provide the various existing group names.
Deploying as a non-admin
Deploying as a non-admin uses the same variables described above. However, two fundamental requirements MUST be satisfied: some IAM resources must be available in the Root compartment and an enclosing compartment must exist, as by design, provisioning the Landing Zone as a non-admin cannot be done directly in the Root compartment. While these requirements can be handled by the tenancy admin on his/her own, V2 provides a helper Terraform root module, the pre-config module, that should be executed previously. Refer to Tenancy Pre Configuration For Deploying CIS OCI Landing Zone as a non-Administrator for the details about executing the pre-config module.
With that basic requirement satisfied, a non-admin can then deploy the Landing Zone by setting up the above variables as:
- use_enclosing_compartment: MUST be set to true.
- existing_enclosing_compartment_ocid: MUST be provided. The compartment must have been created previously.
- policies_in_root_compartment: MUST be set to “USE”.
- use_existing_groups: MUST be set to true.
- existing_*_group_name: MUST provide the various existing group names.
Landing Zone can be deployed with Terraform CLI or with OCI Resource Manager. The general instructions are available at https://github.com/oracle-quickstart/oci-cis-landingzone-quickstart/blob/main/terraform.md. Next we show how to deploy the Landing Zone as non-admin using OCI Resource Manager.
Deploying with OCI Resource Manager
Deploying with OCI Resource Manager is easier and is the recommended option for users that are not familiar with Terraform. Furthermore, OCI Resource Manager provides remote state management with locking, which is ideal if the Landing Zone is to be maintained by a team.
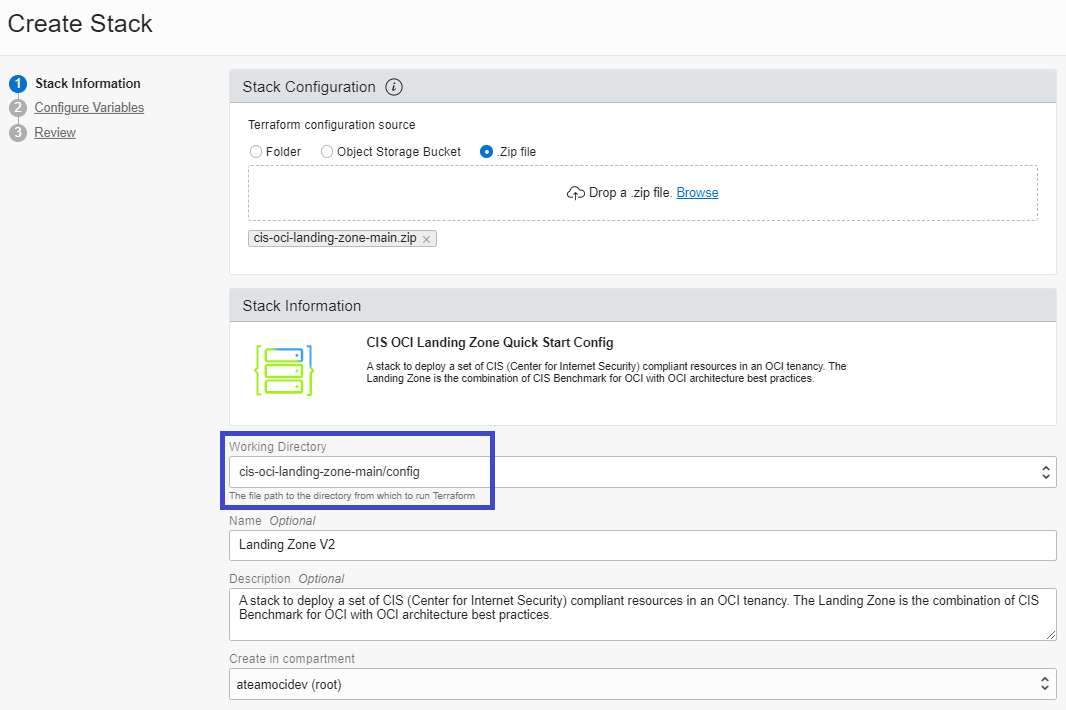
When creating the Resource Manager Stack, make sure to select the config folder in the Working Directory dropdown box:
In the Configure Variables screen, pick a Region and enter a Service Label in the Environment area. The Service Label is a random string of your choice. The Landing Zone uses it as a prefix to all resource names. Make sure to check the Show Advanced Options for setting the environment options.
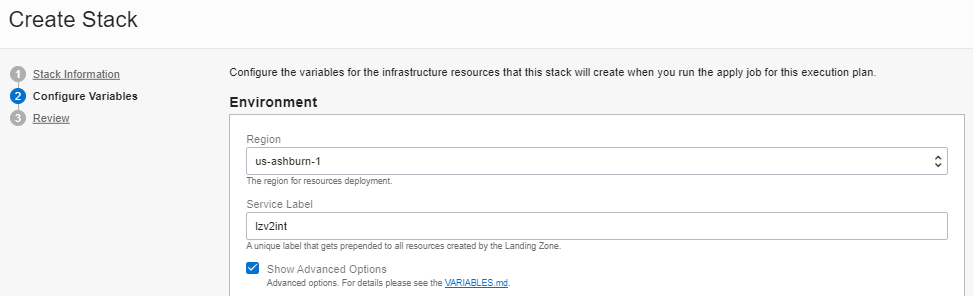
The environment options are displayed. Check Use an enclosing compartment? and select the Existing enclosing compartment in the tree-like structure in that dropdown box.
Select USE in CREATE or USE policies in the root compartment?
Check Use existing groups? box and provide the names of those existing groups in the fields that appear. You must provide all group names.

The End Result
Once the Stack is applied, observe the compartment structure in the picture below. Four child compartments, namely lzv2int-appdev-cmp, lzv2int-database-cmp, lzv2int-network-cmp, lzv2int-security-cmp , are created under lzv2int-top-cmp, our Existing enclosing compartment selected above. It happens to exist under the tenancy Root compartment, as we can see in Parent Compartment.
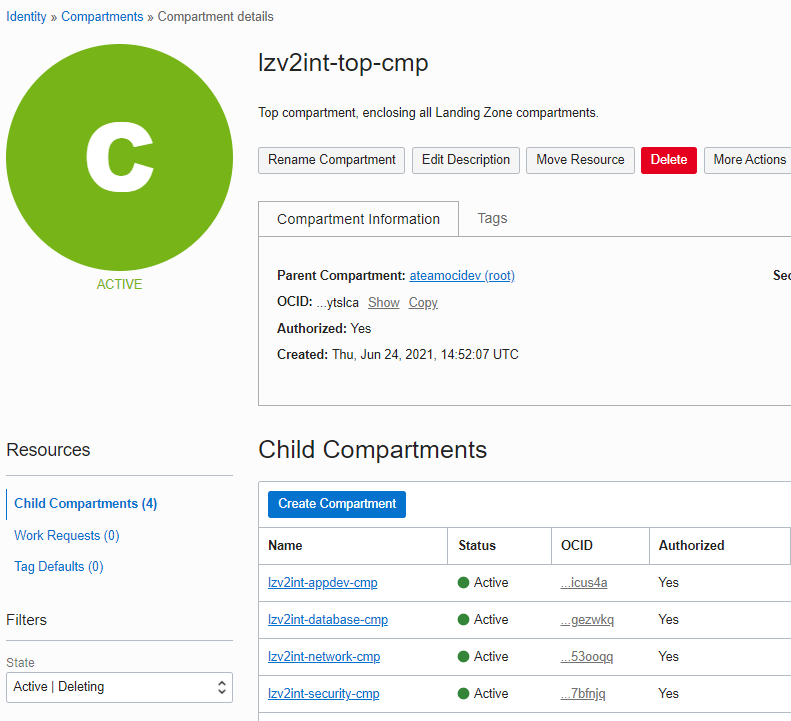
Landing Zone resources are deployed in those four child compartments and policies are automatically applied on them, segregating duties for Landing Zone groups in accordance to the fundamental security principle of least privilege.
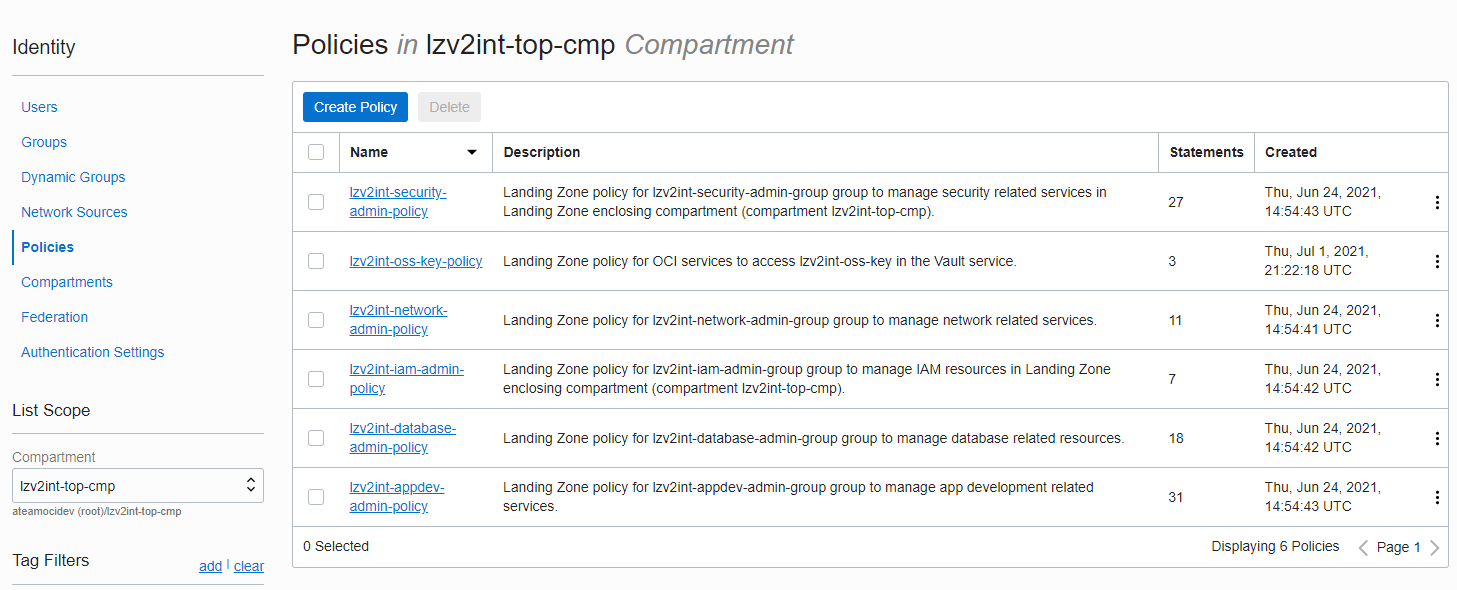
Look at the policies created in the enclosing compartment (lzv2int-top-cmp):
Next Steps
Now that you understand the available user deployment modes for the Landing Zone, look at the documentation for deploying the various services enabled by the Landing Zone.