Introduction
Welcome to Part 7 of the blog series, Extending SaaS by AI/ML features.
Machine learning operations (MLOps) are practices that automate and simplify machine learning workflows and deployments. MLOps is focused on streamlining the process of taking machine learning models to production and maintaining and monitoring them.
Automating ML workflows is an important step in MLOps. Once data scientists are done with experimenting and building models they can move from notebooks to automatic ML workflows. Automation helps to create a repeatable process to orchestrate model development and deployment steps for rapid experimentation and model re-training. In this blog, we will see how we can use OCI Data Science Pipelines to automate the entire model build workflow, including data preparation and feature engineering, model training, model validation, model registration to the model catalog, and model deployment.
Solution Architecture
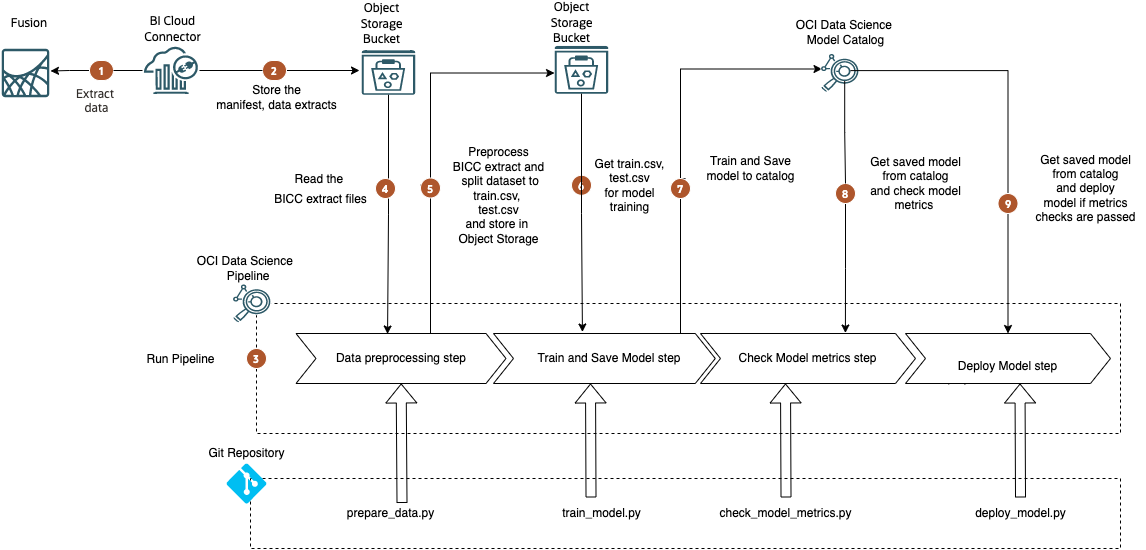
The following diagram shows the reference architecture.
Components
This architecture includes the following components.
OCI Data Science Pipelines lets you define and run an end-to-end machine learning orchestration covering all the steps of the machine learning lifecycle that can be executed in a repeatable, continuous ML pipeline.
The Oracle Accelerated Data Science (ADS) SDK speeds up common data science activities by providing tools that automate and simplify common data science tasks. Additionally, it provides data scientists with a friendly Pythonic interface to OCI services.
OCI Data Science Model Catalog is a centralized and managed repository of model artifacts.
A Data Science model in the model catalog, can be deployed as an HTTP endpoint as model deployment.
OCI Object Storage is a highly scalable and secure Object Storage service that can efficiently store large volumes of data.
A Git Repository for storing the Python script files.
Flow
Following is the flow illustrated in the Solution Architecture diagram.
- Extract training data from Fusion SaaS using BI Cloud Connector(BICC). For details regarding this step, refer to part 1 of this blog series.
- Store the extracted data in an Object Storage Bucket.
- Run the OCI Data Science Pipeline which will execute the Pipeline Steps defined within it. For simplicity, this pipeline has 4 steps defined – Data Preprocessing Step, Train and Save Model Step Check Model metrics Step and Deploy Model Step. Instead of a single pipeline, you can have separate pipelines for various phases, say one each for train, deployment to testing,deployment to production.
- The Data Preprocessing Step reads the BICC extract files from an Object Storage bucket and performs data cleaning, data transformation, feature selection, data splitting to training and testing subsets.
- The Data Preprocessing Step stores the training, and testing data subsets in an Object Storage bucket.
- The Train and Save Model Step reads the data sets stored in the Object Storage bucket and trains the model.
- The Train and Save Model Step stores the trained model in the Model Catalog.
- The Check Model metrics Step reads the model from the Model Catalog and validates the model metrics to determine whether model evaluation criteria are passed.
- The Deploy Model Step deploys the model if the metrics criteria are passed.
Setup
For setup related to extracting BICC content in the solution architecture, refer to previous blogs in this series. The steps related to setting up the ML Pipeline are given below.
Pre-Requisite
In this architecture, the ML Pipeline steps use python scripts stored in a GIT repository. Keep the scripts for data preprocessing, model training, evaluation, and deployment in a GIT repository. A few samples of Python scripts are available here.
Step 1
To set up a pipeline using ADS SDK, open an OCI Data Science Notebook Session and create a new notebook.
Import necessary libraries.
from ads.pipeline import PipelineStep, Pipeline,CustomScriptStep,GitPythonRuntime
Step 2
A pipeline is a workflow of tasks, called steps. A pipeline step can be either a Data Science Job step or a Custom Script step. We will be using Custom Script in this sample.
To use a Custom Script step, infrastructure and runtime must be specified. In infrastructure, you specify the Compute shape, Block Storage size etc. A sample infrastructure is defined below.
infrastructure = (
    CustomScriptStep()
    .with_block_storage_size(200)
    .with_shape_name("VM.Standard3.Flex")
    .with_shape_config_details(ocpus=4, memory_in_gbs=32)
)
Step 3
A Custom Script step can have different types of runtime depending on the source code you run. Refer ADS SDK documentation for different types of runtime.
We will use a GitPythonRuntime . To configure this you must specify the source code url and the entry point. For a public repository, use the “http://” or “https://” URL. Authentication may be required for the SSH URL even if the repository is public. To use a private repository, you must first save an SSH key to OCI Vault as a secret, and provide the secret_ocid when calling with_source().
There are 4 runtimes defined, one for each step – data preprocessing, model training, model metrics checks, and model deployment. Each runtime is associated with a script file – prepare_data.py, train_model.py, check_model_metrics.py and deploy_model.py.
runtime can include custom environment variables to store variables that script files can access. For example, define a custom environment variable in the data_preprocessing_runtime to store the Object Storage bucket name which contains BICC extract files, BICC_IMPORT_BUCKET_NAME.
You also need to specify the service conda environment slug. It can be different for each runtime.
data_preprocessing_runtime = (
    GitPythonRuntime()
    .with_environment_variable(BICC_IMPORT_BUCKET_NAME="bicc-extract" )

    # Specify the service conda environment by slug name.
    .with_service_conda("pytorch19_p37_gpu_v1")
     # Specify the git repository
    .with_source("<git repo URL>")
    # Entrypoint is a relative path from the root of the git repo.
    .with_entrypoint("<path to prepare_data.py>")
)
model_training_runtime = (
    GitPythonRuntime()
    # Specify the service conda environment by slug name.
    .with_service_conda("pytorch19_p37_gpu_v1")
      # Specify the git repository
     .with_source("<git repo URL>")
     # Entrypoint is a relative path from the root of the git repo.
    .with_entrypoint("<path to train_model.py>")

)
model_check_metrics_runtime = (
    GitPythonRuntime()
    # Specify the service conda environment by slug name.
    .with_service_conda("pytorch19_p37_gpu_v1")
      # Specify the git repository
    .with_source("<git repo URL>")
     # Entrypoint is a relative path from the root of the git repo.
    .with_entrypoint("<path to check_model_metrics.py>")

)
model_deployment_runtime = (
    GitPythonRuntime()
    # Specify the service conda environment by slug name.
    .with_service_conda("pytorch19_p37_gpu_v1")
      # Specify the git repository
    .with_source("<git repo URL>")
     # Entrypoint is a relative path from the root of the git repo.
    .with_entrypoint("<path to deploy_model.py")

)
Step 4
The next step is to define the Pipeline Steps using the infrastructure and runtime defined earlier. Here same infrastructure is used for all steps for simplicity. But you can define different infrastructures for each step, say a much bigger instance for Model training than for the Check Model metrics step.
pipeline_step_preprocessing = (
    PipelineStep("Data Preprocessing")
    .with_description("Step for Data preprocessing")

    .with_infrastructure(infrastructure)
    .with_runtime(data_preprocessing_runtime)
)
pipeline_step_model_training = (
    PipelineStep("Model Training")
    .with_description("Step for Model Training")
    .with_infrastructure(infrastructure)
    .with_runtime(model_training_runtime)
)
pipeline_step_check_model_metrics = (
    PipelineStep("Check Model Metrics")
    .with_description("Step for Checking Model Metrics")
    .with_infrastructure(infrastructure)
    .with_runtime(model_check_metrics_runtime)
)
pipeline_step_model_deployment = (
    PipelineStep("Model Deployment")
    .with_description("Step for Model Deployment")
    .with_infrastructure(infrastructure)
    .with_runtime(model_deployment_runtime)
)
Step 5
The next step is to define the Pipeline. Any common environment variable used across Steps can be defined at the Pipeline level. Eg: TRAINING_DATA_BUCKET_NAME, MODEL_OCID,IS_MODEL_EVALUATION_PASSED, BUCKETS_NAMESPACE etc.
Add the logging details and the Steps defined earlier in with_step_details ().
pipeline = (
    Pipeline("Model Build and Deploy pipeline")
     # Define any custom environment variable.
     .with_environment_variable(TRAINING_DATA_BUCKET_NAME="bicc-extract",MODEL_OCID="",IS_MODEL_EVALUATION_PASSED="",BUCKETS_NAMESPACE="idprjj0k7dv3")

    # If you are running this in an OCI data science notebook session,
    # the following configurations are not required.
    # Configurations from the notebook session will be used as defaults.
     .with_compartment_id("<compartment OCID>")
     .with_project_id("<Data Science project OCID>")
    # Configure logging for getting the  run outputs.
     .with_log_group_id("<log group OCID>")
     .with_log_id("<log OCID>")
     # to stream service log in pipeline runs
    .with_enable_service_log(True)
    .with_step_details([ pipeline_step_preprocessing, pipeline_step_model_training,pipeline_step_check_model_metrics,pipeline_step_model_deployment])

)
Step 6
Create the pipeline and run it.
pipeline.create()
A Pipeline Run is the execution instance of a Pipeline. You can call the run() method of the Pipeline instance to launch a new Pipeline Run.
# Run a pipeline, a pipeline run will be created and started
pipeline_run = pipeline.run()
Step 7
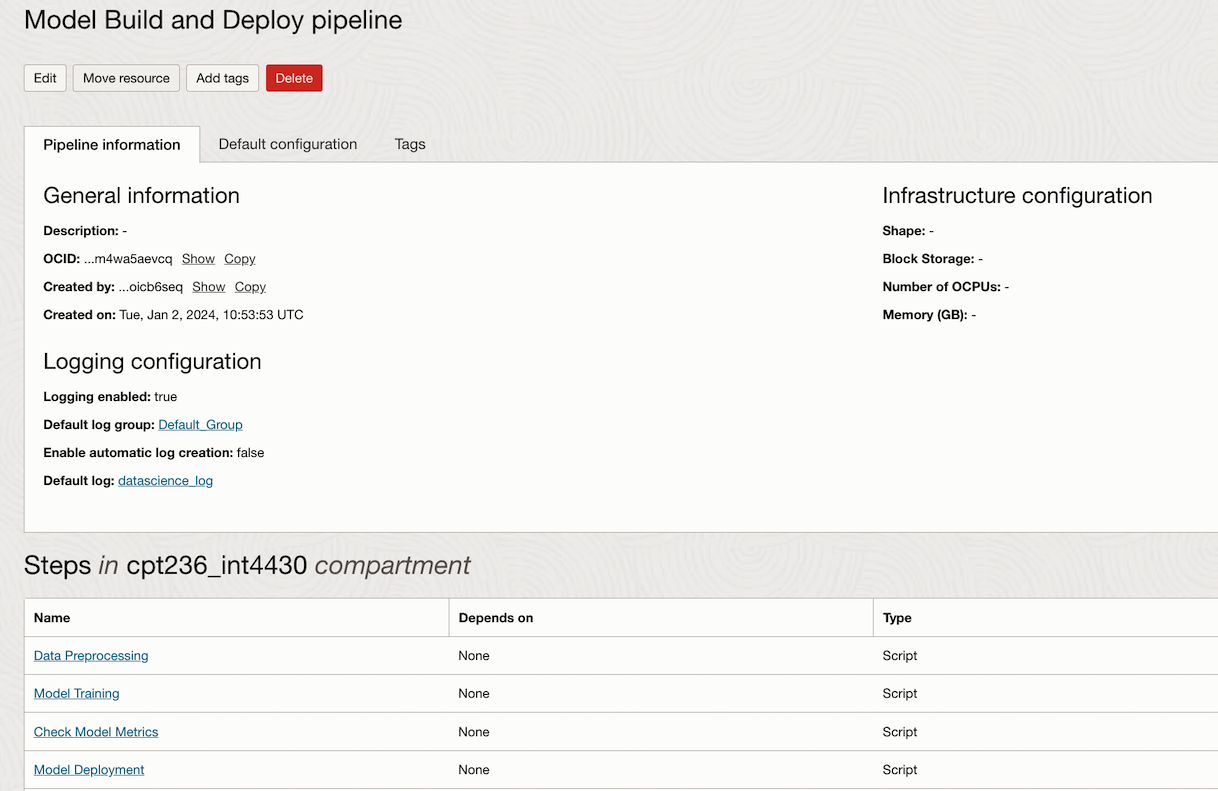
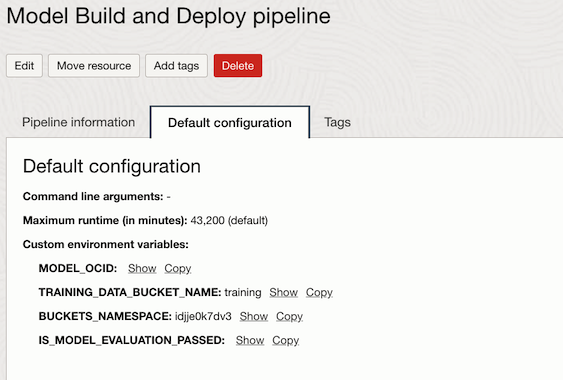
Validate from the OCI console if the pipeline is created and run successfully.
Pipeline Information and steps within the pipeline in OCI Console.
Pipeline configuration including the Custom Environment variables.
Data Preprocessing Step configuration including the infrastructure.
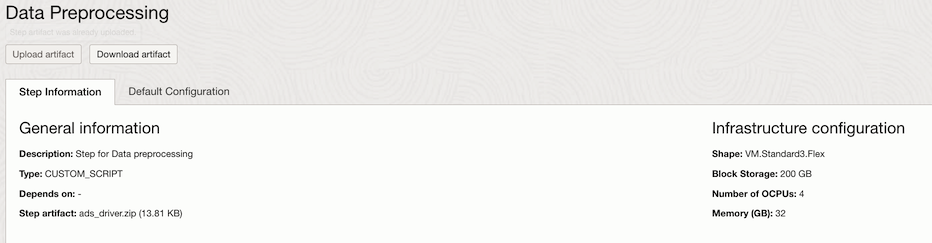
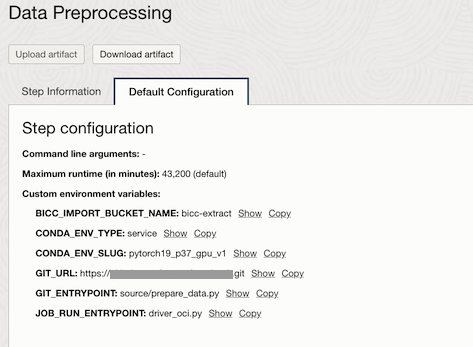
Data Preprocessing Step Configuration. You can see the Custom environment variables also here.
Conclusion
The iterative nature of model development demands a systematic approach, and a robust ML workflow provides the structure necessary to manage the complexity of evolving models and changing data landscapes.
Ultimately, a well-orchestrated ML workflow, integrated into the broader MLOps framework, becomes the backbone of successful machine learning implementations.
To walk through a successful ML workflow use case, check out Behind the Scenes: Transforming cloud security with MLOps. The piece explains the end-to-end process of integrating MLOps to react, predict, and preempt cyber threats at scale.